Wholesale Lock Manager - FAQ
Frequently Asked Questions for Wholesale Lock Manager
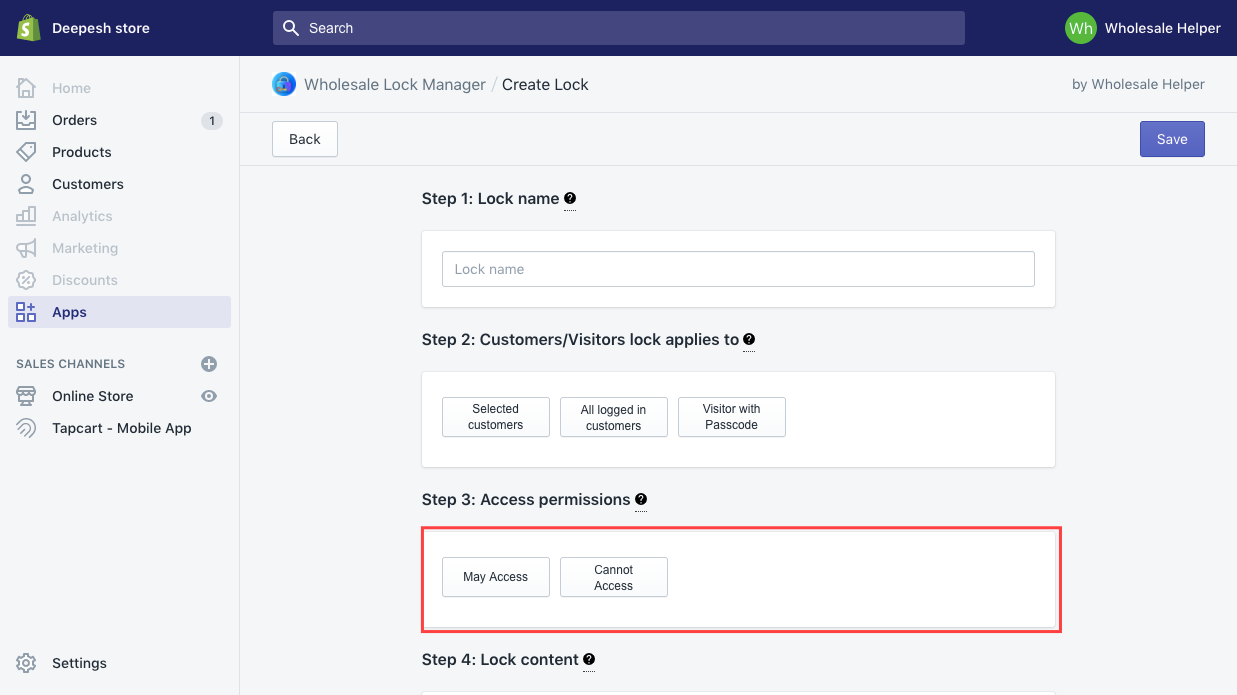
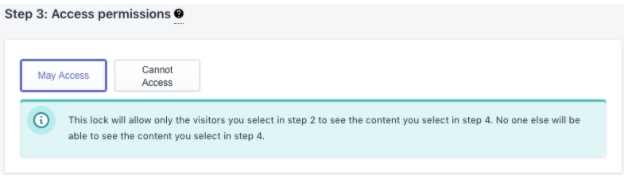
1. What does Access Permissions do?
Access permission lets the user choose if the selected customer / visitors should or should not have access to the restricted content or site.
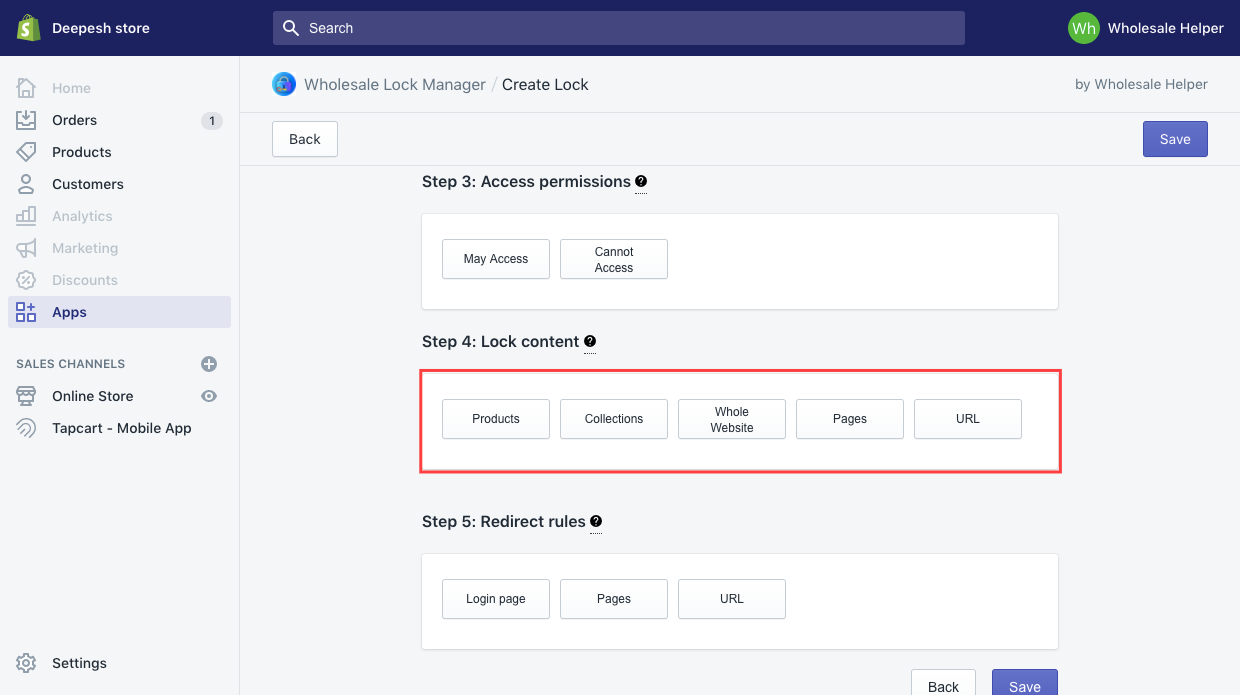
2. What type of content can I lock?
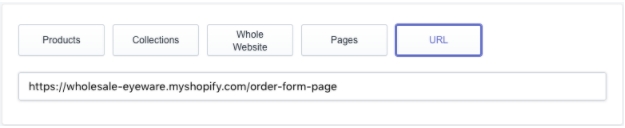
User can lock Products, Collections, Whole Website, Pages and specific URLs
3. What type of customers can I restrict?
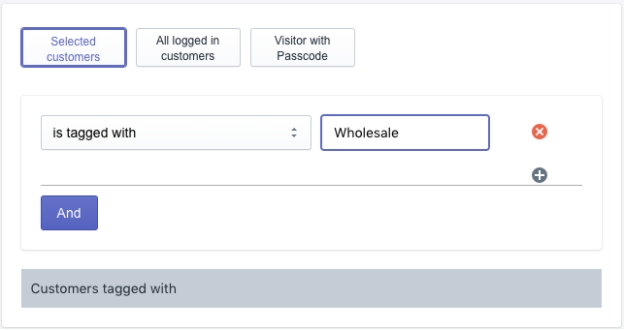
Selected Customers let the user target a specific audience by using their email or tags that might be assigned to them.
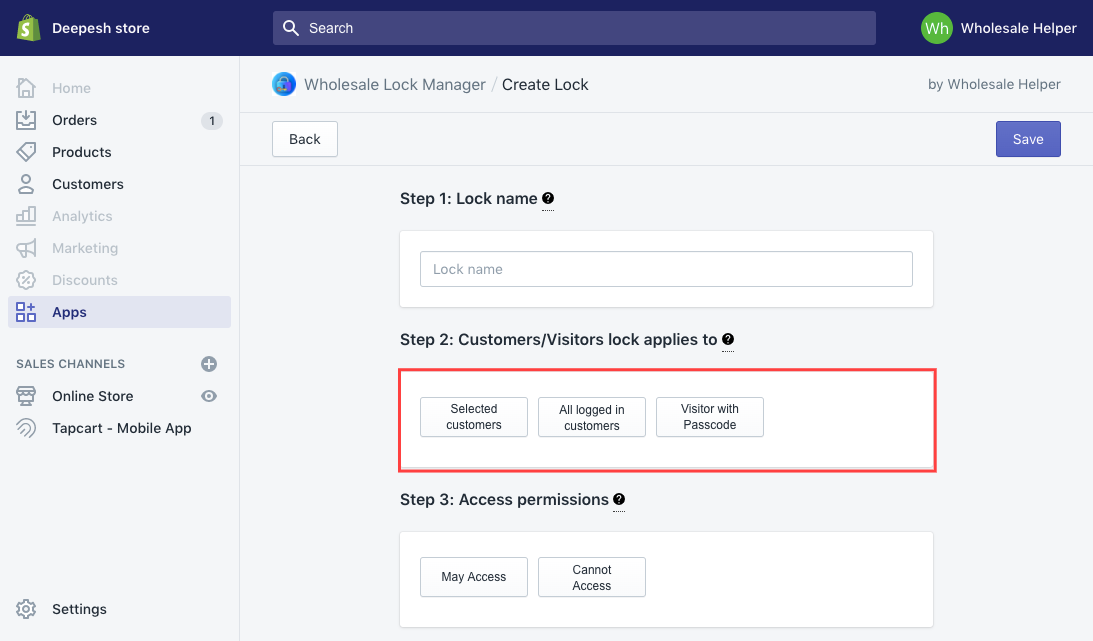
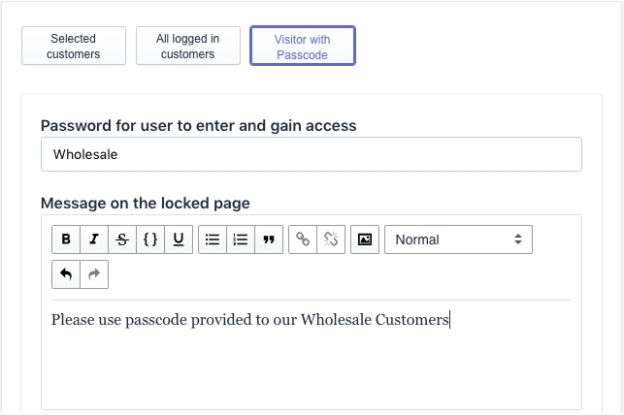
All Logged-in Customers lets the user control restriction of content for all customers that are all logged-in to the store. Visitor with Passcode lets the user provide custom passcode to the visitors / customers so that they are the only ones able to access restricted content.
4. What should I have my lock do if a visitor tries to access locked content?
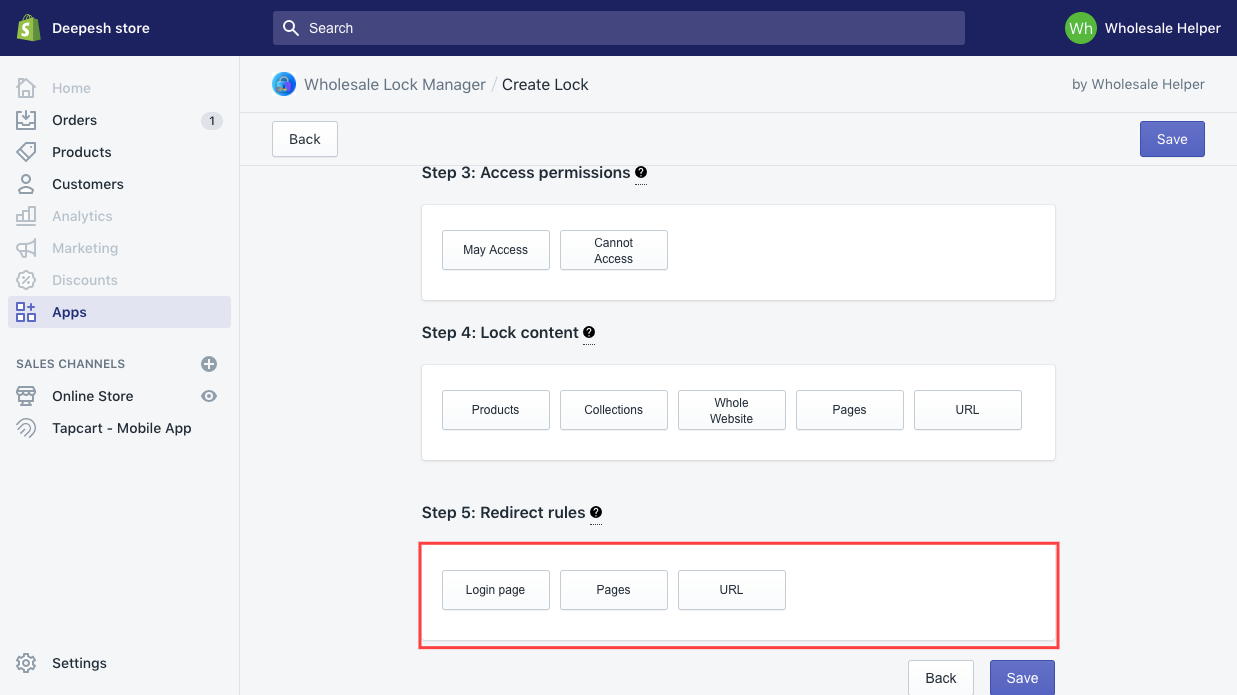
If you have set the permission setting to “Cannot Access” then you’d have to specify the landing page for the visitor or customer that they should be redirected to.
1) You can have them be rerouted to the Login Page, this takes them back to the login screen of the store. 2) You can also have them redirected to a particular page of your choice native to the shopify store You can have them rerouted to a specific URL, that can be either a shopify native page or an external site such as AOL or Google.
5. How do I lock a specific page for visitors?
Here are the steps to lock a specific page.
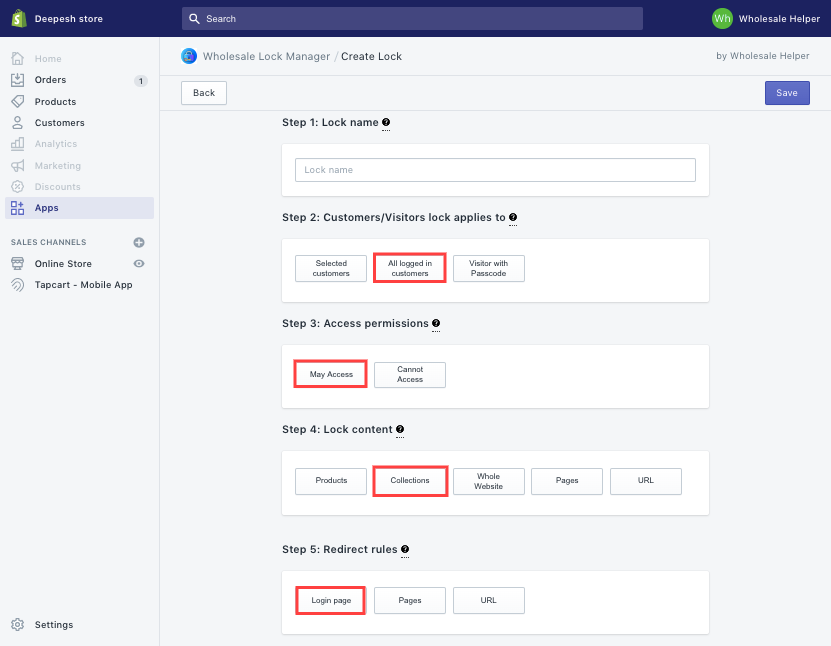
1) Click “Create Lock” from the home screen. 2) In Step 1 give a name to your Lock
3) In Step 2 identify the visitors / customers the Lock should be applied on, in this case 'All Logged-in Customers'.
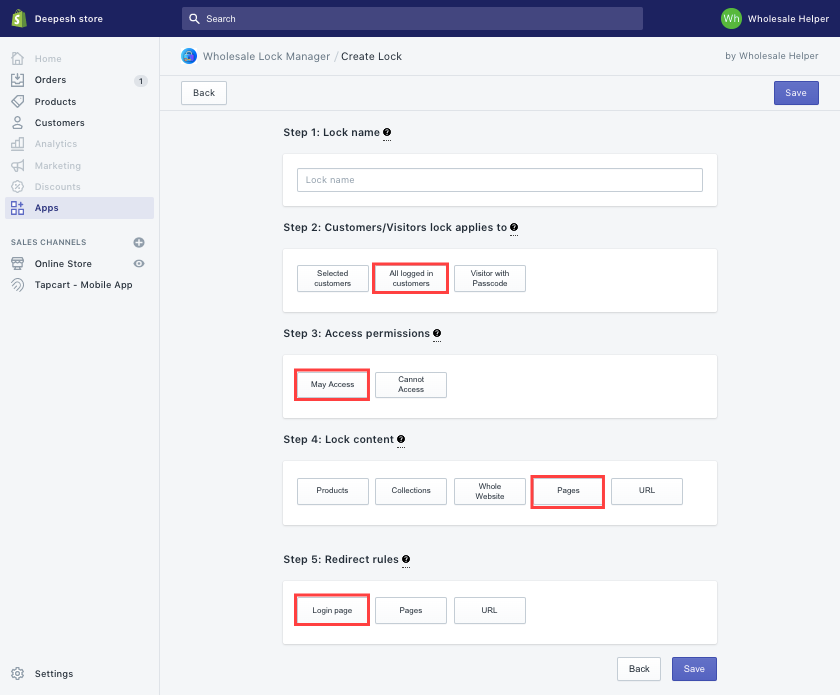
4) In Step 3 select “May Access” specifically because you don’t intend to give access to the visitors, but just to logged-in customers.
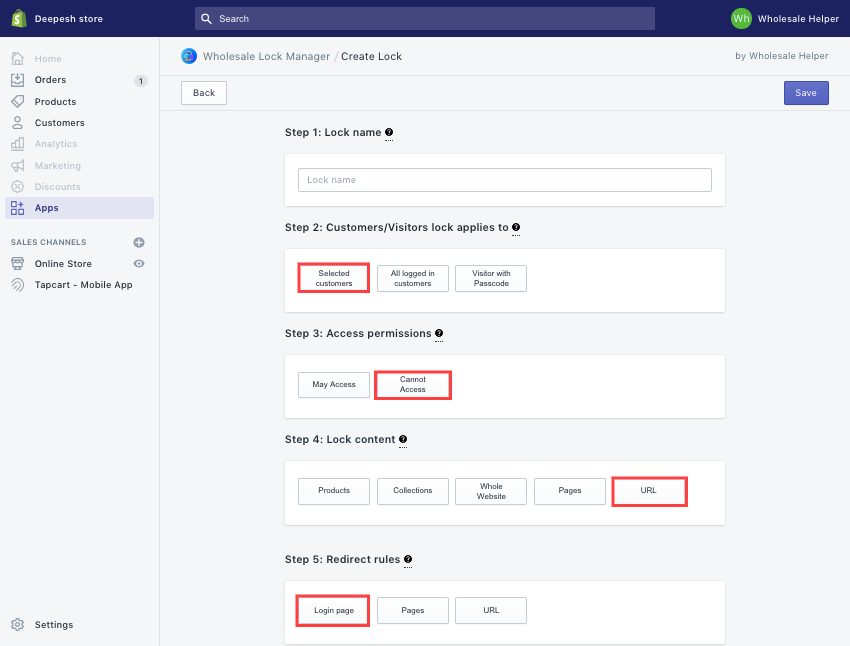
5) From Step 4 select “Pages” and then select the page you intend to restrict for people selected in Step 2. Here I have selected the “Search” page.
6) In Step 5, add the landing site visitors / customers should be redirected to upon attempting to access the restricted area. Here, I've selected the Login Page.
6. How do I lock a specific URL?
Here are the steps of locking a specific URL
1) Click “Create Lock” from the home screen.
2) In Step 1 give a name to your Lock
3) In Step 2 identify the visitors / customers the Lock should be applied on. Here, I've chosen to target "Selected Customers"
4) In Step 3 select “Cannot Access” specifically because you don’t intend to give access to the visitors / customers you’ve selected in Step 2
5) From Step 4 select “URL” and then select the page you intend to restrict for people selected in Step 2. Here I have selected the “Search” URL from my store.
6) In Step 5, add the landing site visitors / customers should be redirected to upon attempting to access the restricted area. Here I've selected the Login Page.
7. How do I choose what visitors can see a specific page?
1) Click “Create Lock” from the home screen.
2) In Step 1 give a name to your Lock
3) In Step 2 identify the visitors / customers the Lock should be applied on. You can select “Selected Customers”, “All Logged-in Customers”, or “Visitors with Passcodes”. For this example I've selected "All Logged-in Customers".
4) In Step 3 select the Access Permission for the visitors / customers you chose in Step 2. We've selected "May Access" for this example.
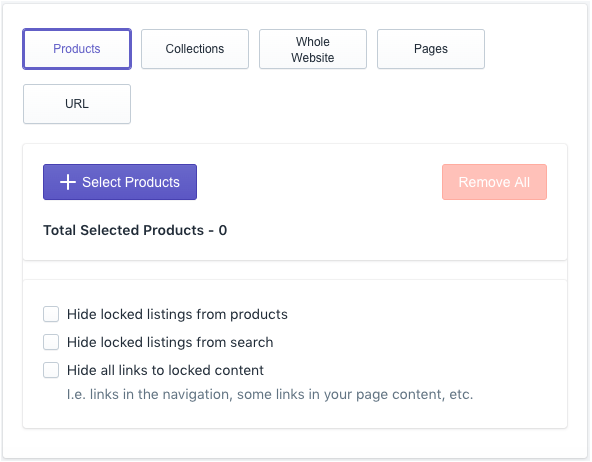
5) From Step 4 select the Product, Collection, Whole Website, Pages or URL you intend to restrict for people selected in Step 2. Here I have selected Collection.
6) In Step 5, add the landing site visitors / customers should be redirected to upon attempting to access the page if it’s restricted for them. I've selected "Log-in Page" - so that means people that are not logged in are going to be redirected to the Log-in Page.
8. How do I lock my whole website from non-logged in customers?
Here are the steps to lock the entire store
1) Click “Create Lock” from the home screen.
2) In Step 1 give a name to your Lock
3) In Step 2 identify the visitors / customers the Lock should be applied on. In this step select “All Logged-in Customers”
4) In Step 3 select the Access Permission for the visitors / customers you’ve selected in Step 2 and set it to “May Access” as you need to give access to Logged-in Customers and keep the Non-Logged-in ones out.
5) From Step 4 select “Whole Website” to give access to people selected in Step 2, and lock the rest out unless they sign-up or login.
6) In Step 5, add the landing site visitors / customers should be redirected to upon attempting to access the site if it’s restricted for them
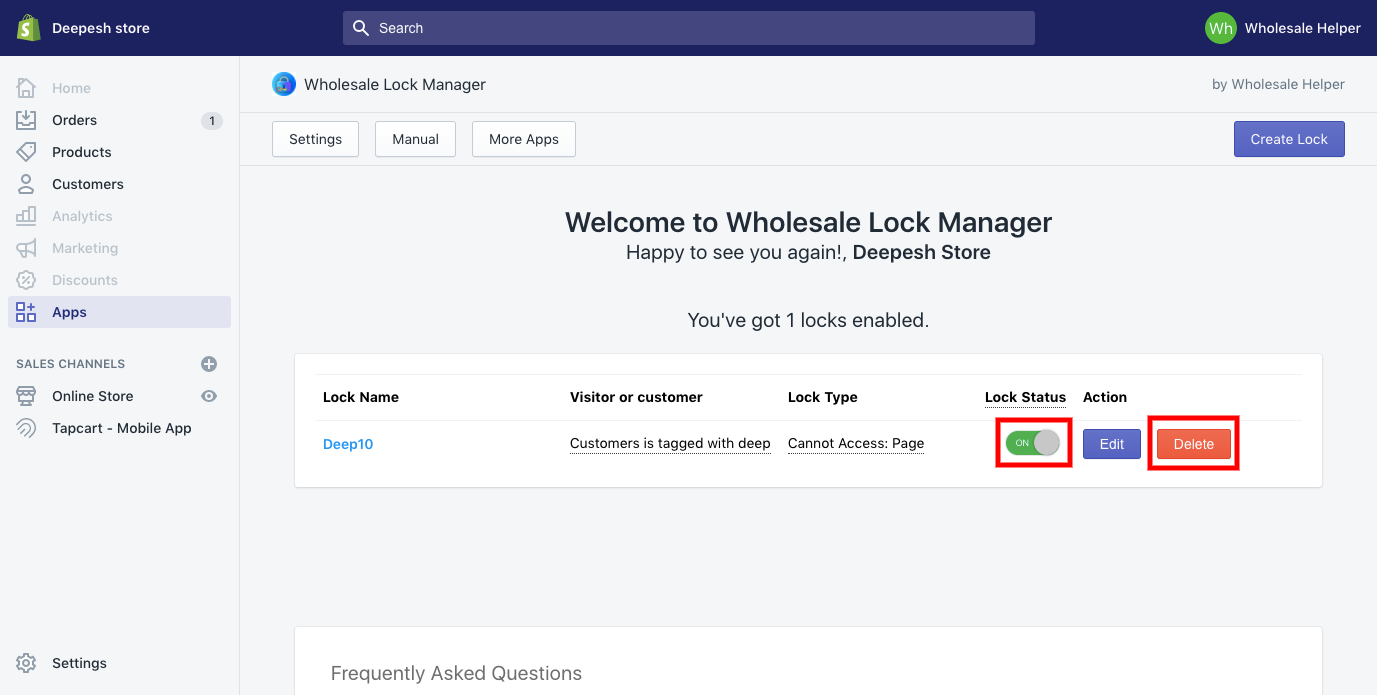
9. What if I no longer want to lock a specific page?
1) Simply open up the Lock Manager app and toggle the Lock from the list. If the lock status is ‘OFF’ then it’s disabled.
2) OR - You can also delete a specific Lock. Remember deleted locks cannot be recovered.
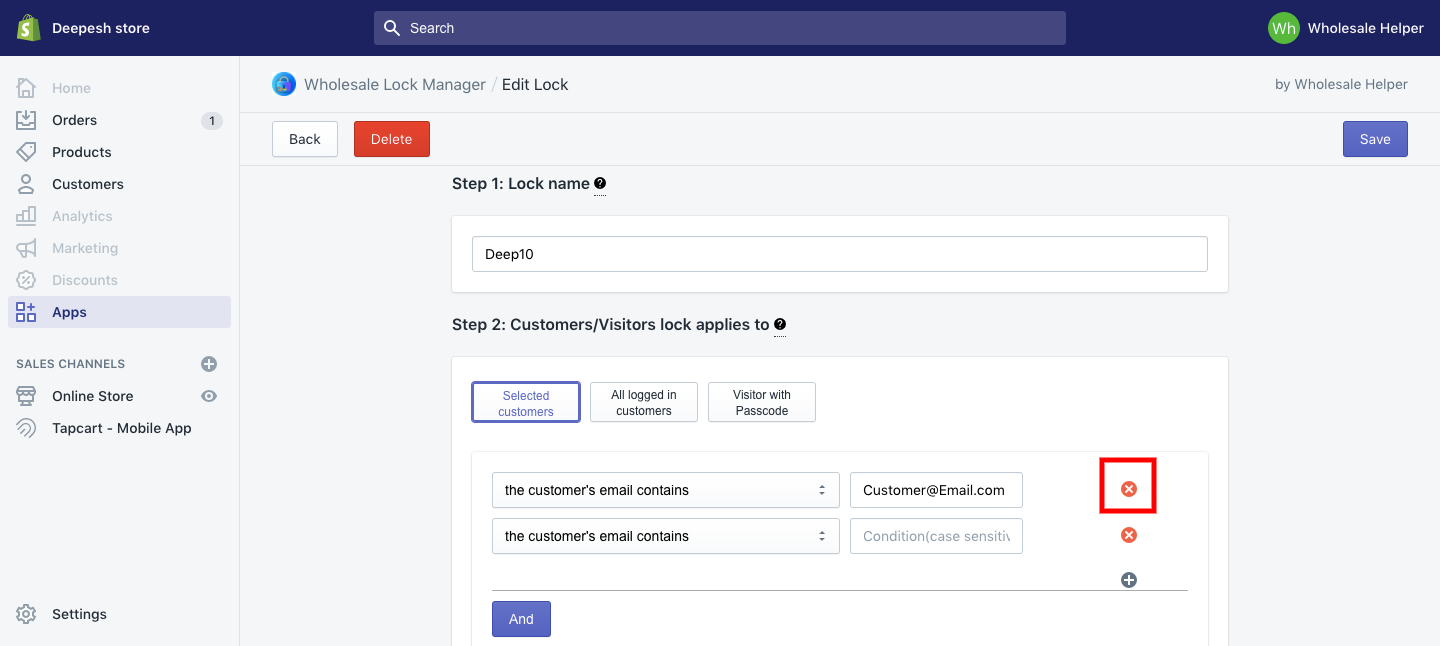
10. How do I remove access for a customer that previously had access?
Go to the Lock that grants the customer access to the content you intend to restrict them out of. They’ll have access due to their email or tag. From the Second Step “Selected Customers” option just click on the small red cross, and their access is going to be removed.
11. How do I limit access to my order form for only wholesale customers?
You can lock specific content in step 4 of the app. There just select “Order Form” if it exists as a page or simply select “URL” and put in the address of the Order Form in there to restrict access to it from Step 4 of Create Lock process.
Once restricted, identify the audience such as Wholesale Customers that should have access to it in step 2 by either tagging or handing out a passcode to them.
You’d need to set Access Level in step 3 as “May Access” if you are using tags to give them access to order forms.
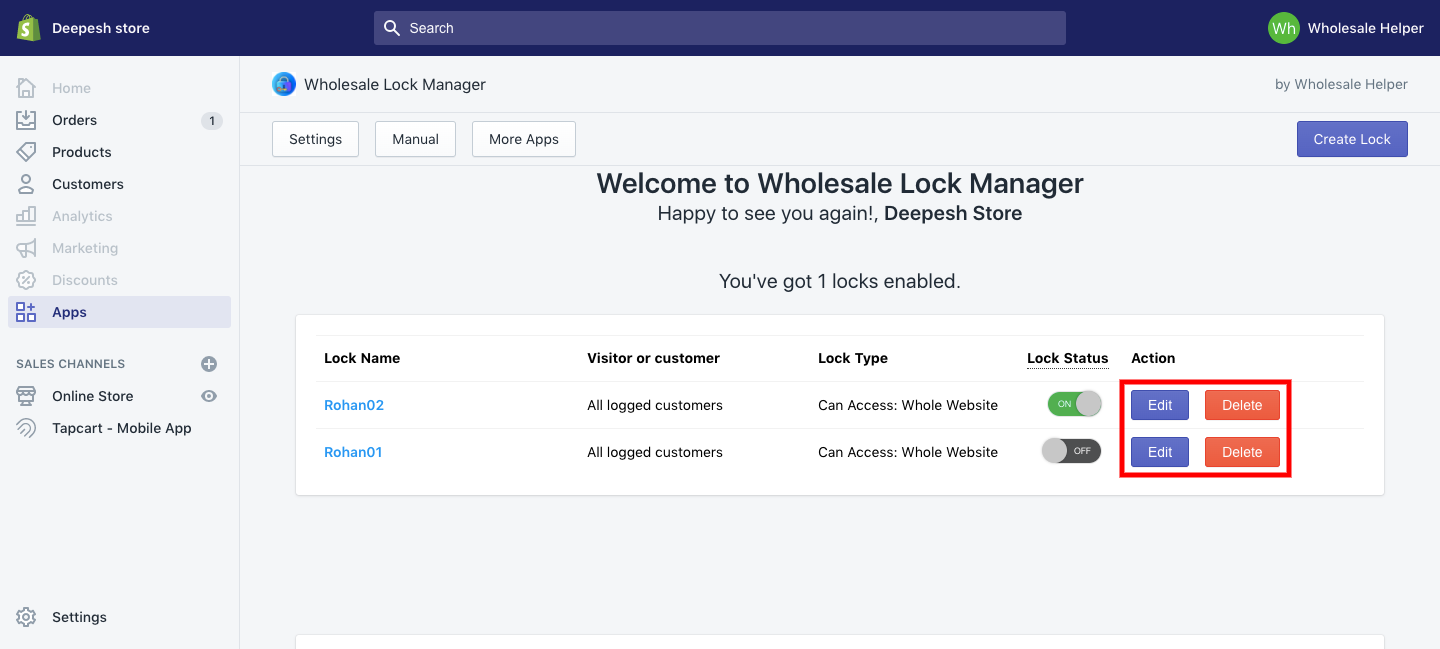
12. How do I enable/disable a particular lock?
You can disable a particular lock by going into Apps, selecting Lock Manager application and then from the Lock Status column just toggle the button. Here, ON means the Lock is active, and OFF means the Lock is inactive.
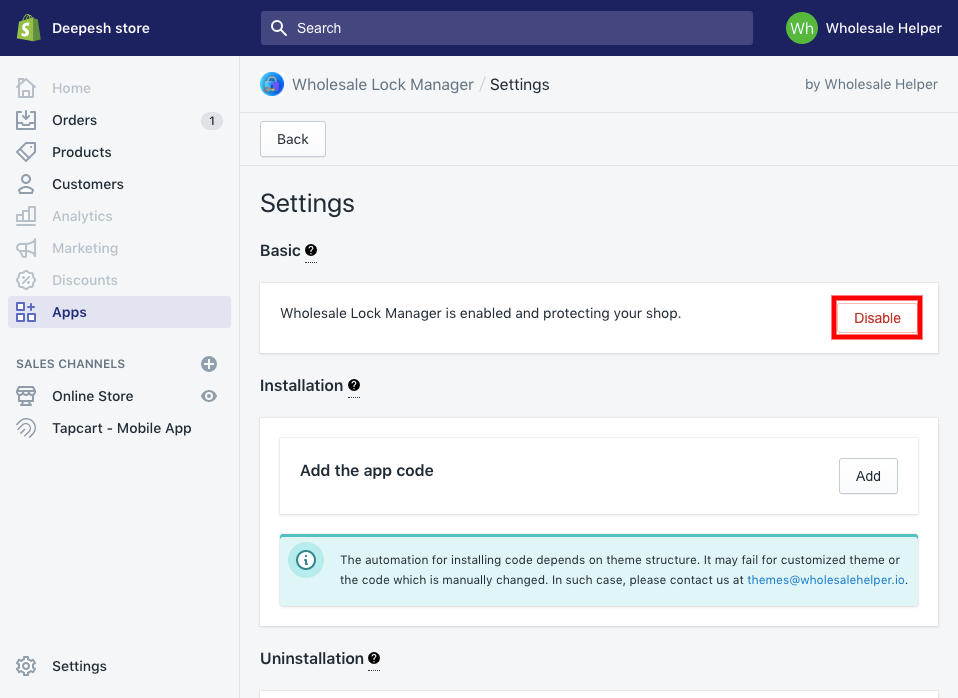
You can disable all the locks and the applications, instead of deleting it, or removing the code for it by going into the Settings menu from the Lock Manager home screen and disabling the application from there.
13. Am I able to hide products based on variants?
Wholesale Lock Manager app can hide specific products and not its variants. So if you have product A and it has B and C as its variants then hiding product A doesn’t mean B and C are going to be hidden also. For this purpose you can hide an entire collection though - i.e for as long as all the products A, B and C are part of a single collection then you can hide that entire collection.
14. How do I enable/disable all locks simultaneously?
1) From the Home screen, go to Settings.
2) Click the “Disable” red button.
3) It will ask for confirmation. Click “Yes” to disable all locks.
15. My contents are still locked after uninstalling Wholesale Lock Manager. What should I do?
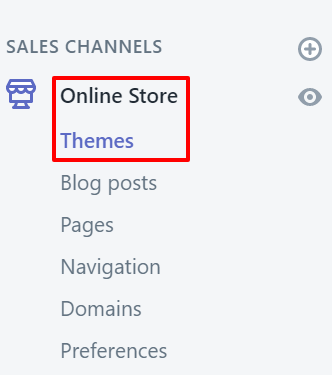
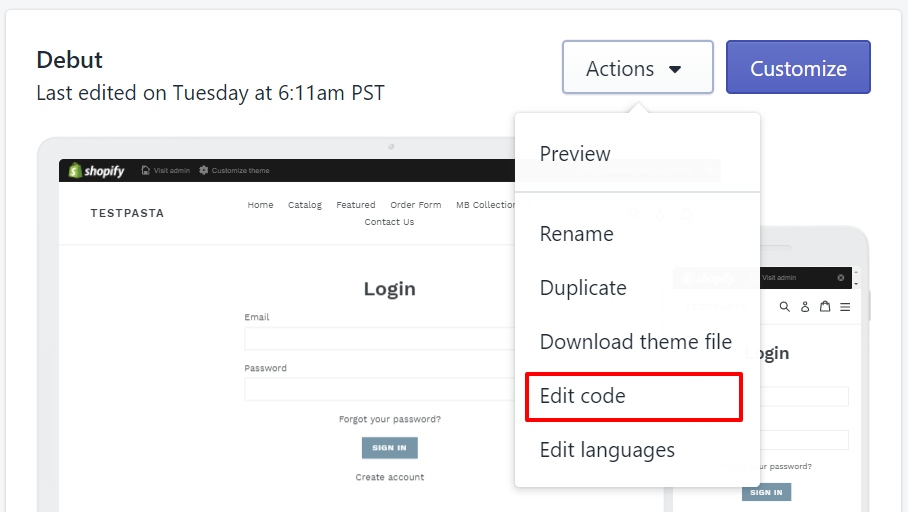
1) You may email us for this on themes@wholesalehelper.io. Or just go through these steps. Go to “Online Stores” from the sidebar of the admin area and select “Themes” menu.
2) Click “Actions” drop down and “Edit Code” menu from it.
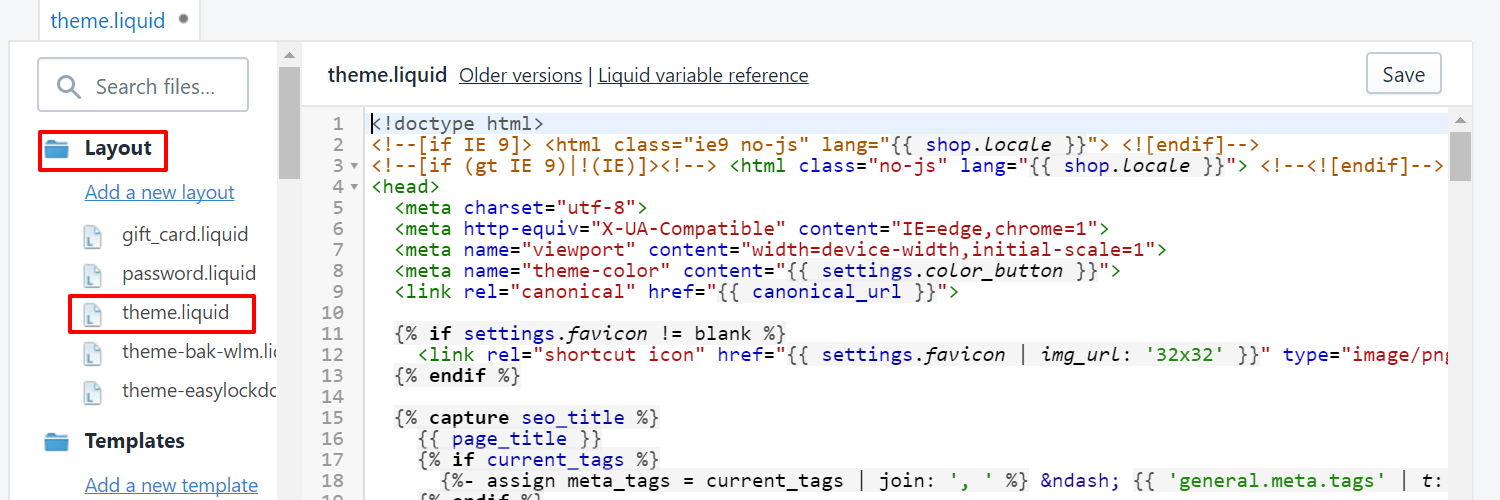
3) Open “theme.liquid” file for “Layout” section.
4) Search {% include 'wlm-head' %}line and remove it from the file.
5) Search {% comment %}{{ content_for_layout }}{% endcomment %}{% include 'wlm-body' %}and replace it with {{ content_for_layout }}.
6) Your contents should be unlocked now. You can also email us at themes@wholesalehelper.io if you need further help.
16. I updated my theme and need help with my lock? What do I do?
At $6.99 per month, our model does not allow us to provide unlimited free tech support. We charge $40 per hour for developer support and updating the app according to the latest theme usually takes 1-2 hour
17. Do you offer free installation and support?
We are here to help and offer complementary support for 2 hours when you install one of our apps. This typically equals a few emails explaining product features, 1-2 potential small customizations and a basic theme update.
If you need more help, we are here and available. We do have to charge for this additional time as we cannot offer unlimited free support. Our team has server, software, people, design, and marketing costs.
In order for us to operate effectively and serve you (and your customers) for the long term, we need to charge for additional support needs. As a fellow business, we hope you understand our perspective.
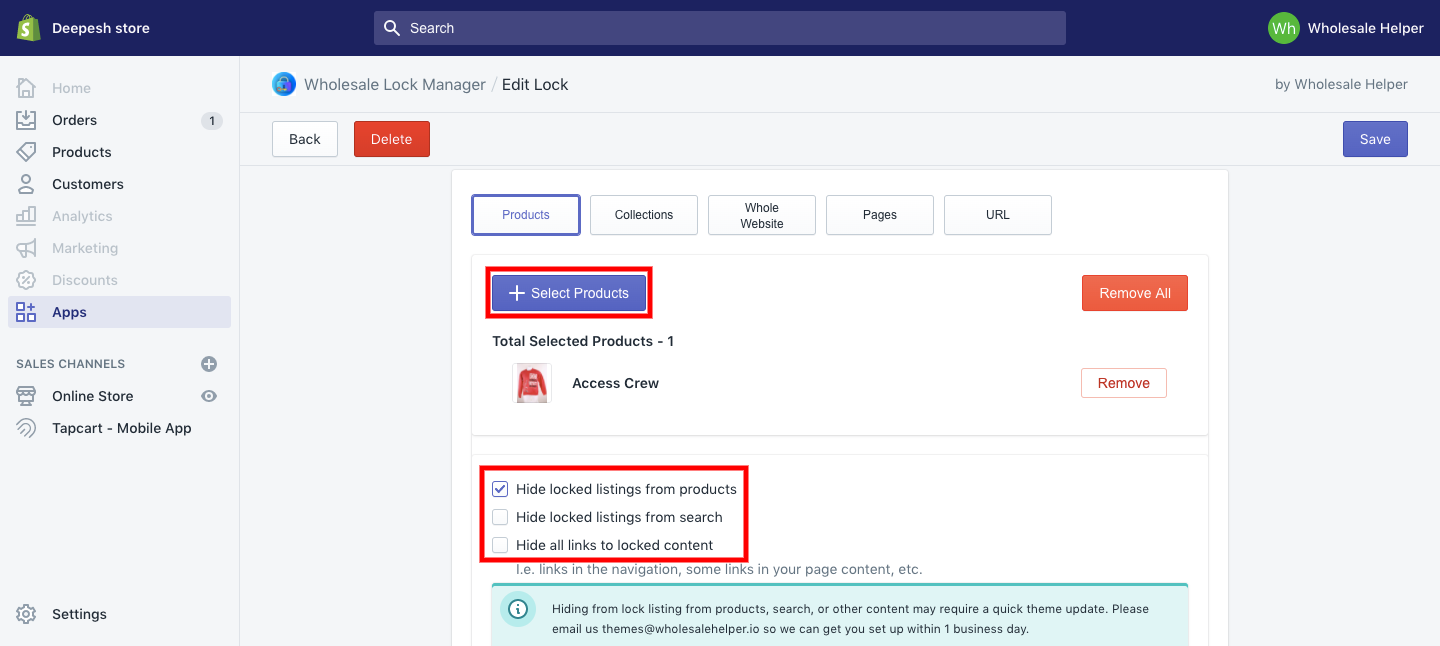
18. How do I lock a specific product?
When you’re editing or creating a lock, just go to step 4 after completing the initial steps and select “Product”.
Click the “+Select Products” button and it’s going to pop open a menu that’ll have all of your products listed in there. Just select the one you’d like to put the restriction on and hit add.
19. How to lock specific collections?
When you’re editing or creating a lock, just go to step 4 after completing the initial steps and select “Collection”.
Click the “+Select Collection” button and it’s going to pop open a menu that’ll have all of your collections listed in there. Just select the one you’d like to put the restriction on and hit add.
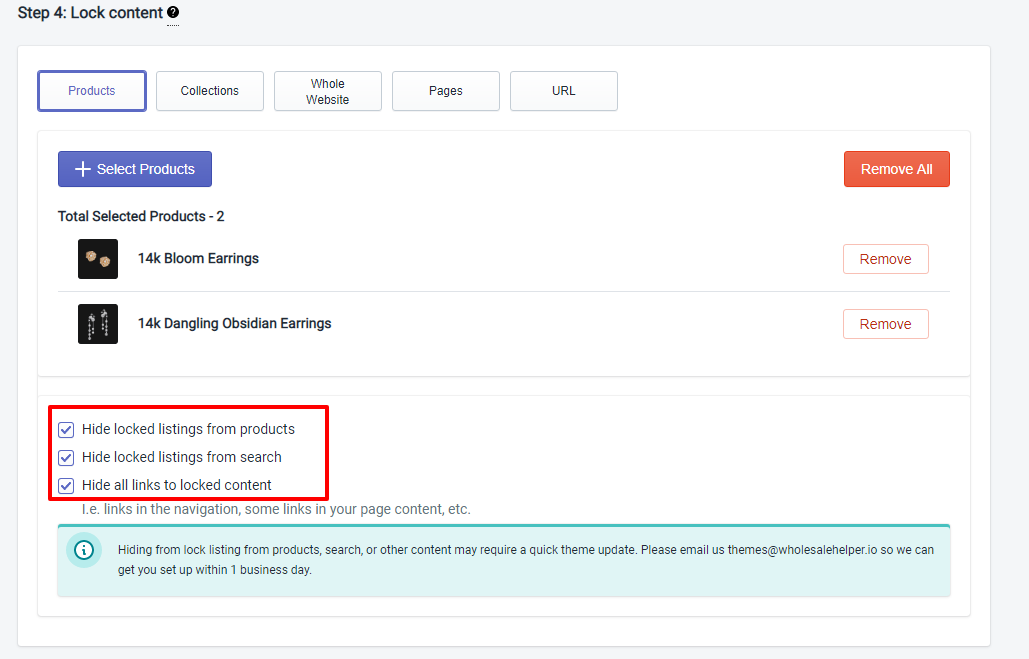
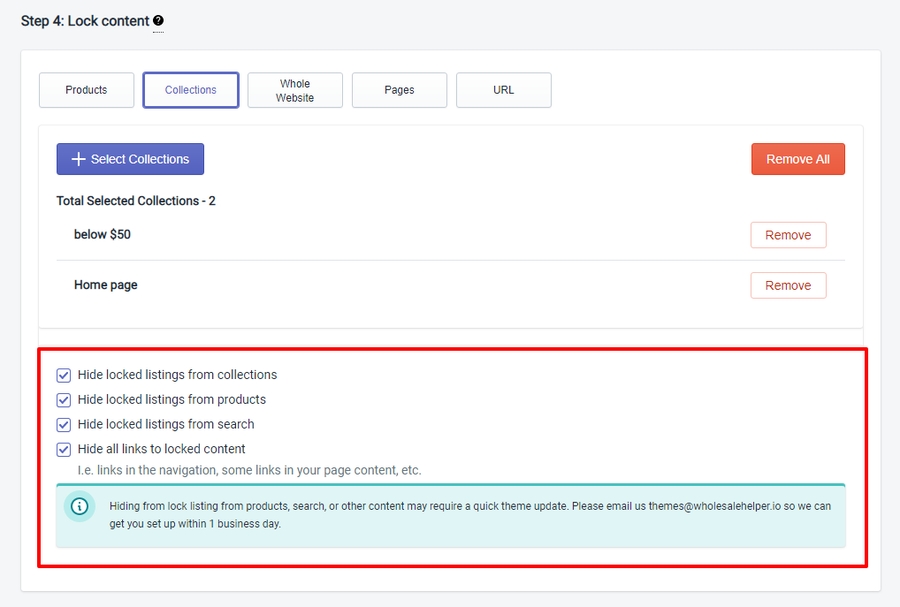
20. How to hide lock content from search?
When you’re editing or creating a lock, just go to step 4 after completing the initial steps and select the Products or Collections you’d like to hide from the search results.
Check out the box that says “Hide Locked Listings from Search” and hit save at the end. Remember, hiding products or collections may require a theme update. Please email us at themes@wholesalehelper.io if assistance is needed in this regard.
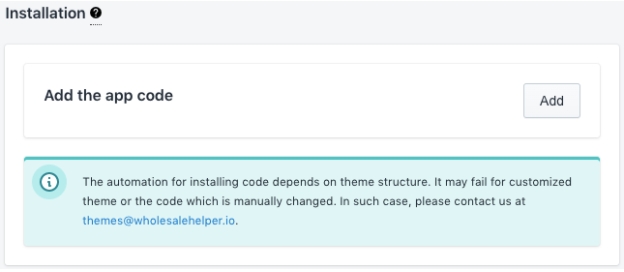
21. How do I add / remove the code of the app to my store?
Go to Apps from the admin panel on the left and open up Lock Manager. On the homepage of the Lock Manager click on Settings on the top.
In Settings, go to the Installation section and click on Add. This is going to automatically add the code for Lock Manager to your Store.
22. What name can I give my lock?
When you start creating a Lock. You have to give your Lock a name in the first step. Good thing is there are no rules on giving a name to your Lock so feel free to pick a name of your choice.
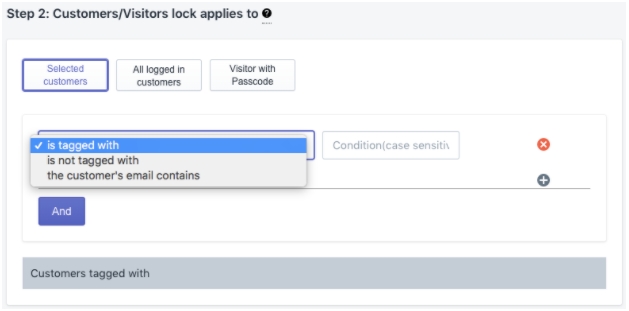
23. What does the 'Selected Customers' option do?
In the second step of creating a Lock. You get 3 options to choose from ‘Selected Customers’, ‘All Logged-in Customers’, and ‘Visitors w/ Passcodes’.
The ‘Selected Customers’ option lets you apply the Lock on selected people. You can choose from ‘is tagged’, ‘is NOT tagged’, and ‘customer’s email contains’.
Is Tagged lets you target logged in customers that you have assigned a specific tag to.
Is NOT Tagged does the same thing, but it excludes the logged in customers that have a specific tag assigned to them.
Customer Email Contains lets you target logged in customers by using their entire email address or parts of it.
The And option lets you add criteria to select customers multiple times. Remember that the text is case sensitive for the tag or emails that you’ll be entering in the text bar.
24. What does 'All Logged-in Customers' option do?
In the second step of creating a Lock. The second option of ‘All Logged-in Customers’ lets you target all the customers that log into your store. It doesn’t include visitors as they do not login to the store by punching in an email and password.
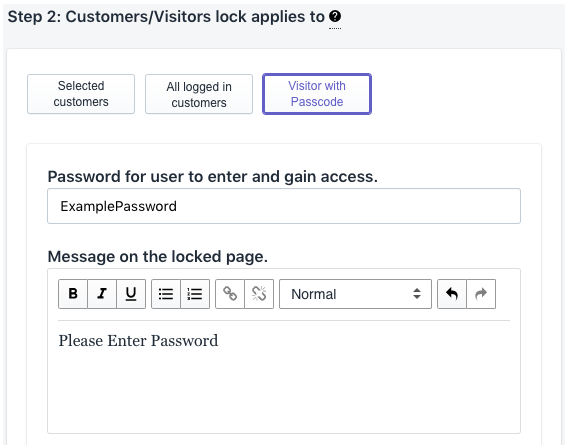
25. What does 'Visitor with Passcode' option do?
In the second step of creating a Lock. The third option of ‘Visitor with Passcode’ lets you target everyone visiting your store.
It prompts them to enter a passcode to proceed ahead to restricted content or products. For example, here I’ve set the password to ‘ExamplePassword’ and the message that a visitor / customer is going to see upon attempting to access a restricted part of the site is ‘Please Enter Password’.
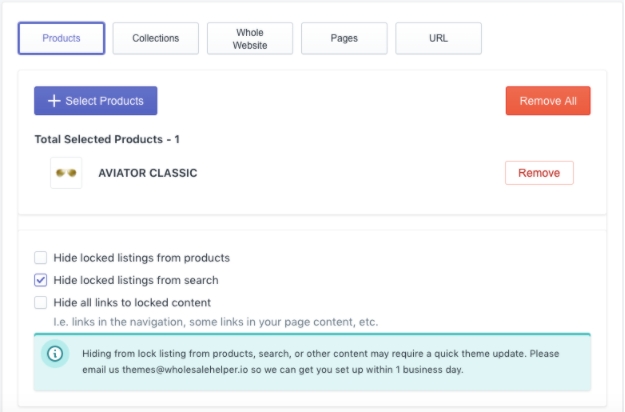
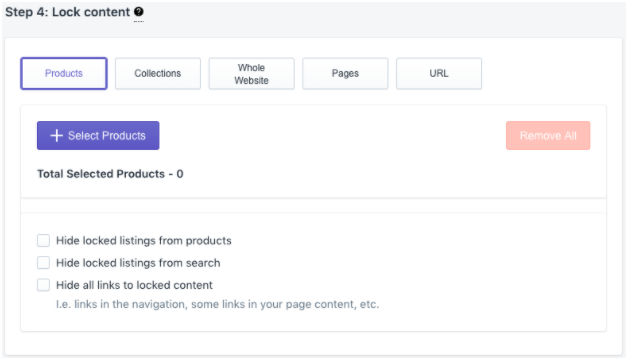
26. What does the 'Product' option do?
When creating a Lock, in the fourth step, you have to select the content you intend to restrict. The first option here is that of ‘Products’.
You may click on Select Products to choose specific products that you’d like to Lock-out. You may choose multiple products by simply clicking on the box next to each on them. Once selected, just hit Add at the bottom.
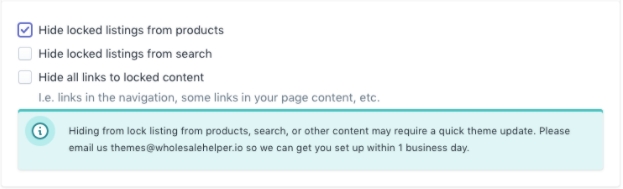
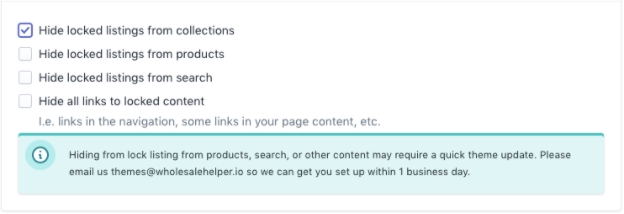
You may also hide the added products from your ‘Product Listing’, ‘Search Results’, or hide all ‘Links to Content’ that may lead to restricted products.
Remember, this may require changes to the theme so please reach out to us on theme@wholesalehelper.io.
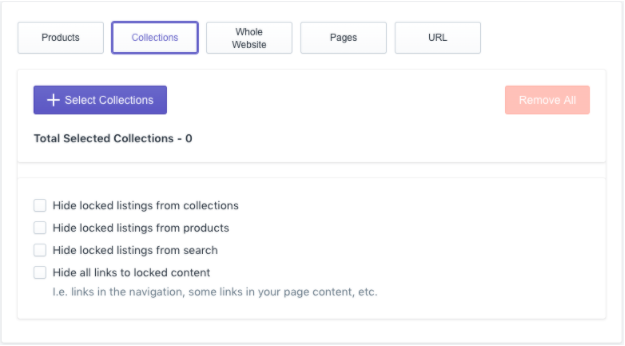
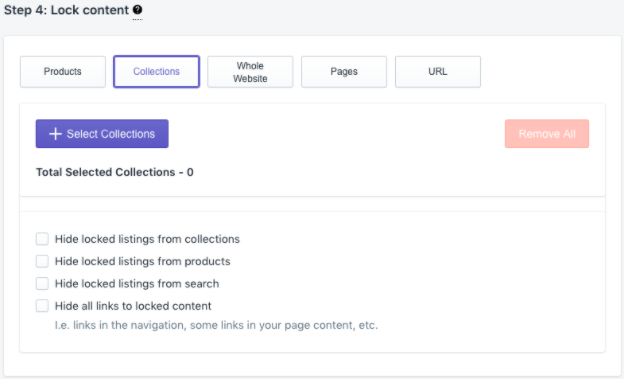
27. What does the ‘Collections’ option do?
When creating a Lock in the fourth step, you have to select the content you intend to restrict. The second option here is that of ‘Collections’. It is similar to the Products option in the same step, but each collection is composed of multiple products.
You may click on Select Collections to choose a Collection of Products that you’d like to Lock-out. You may choose multiple collections by simply clicking on the box next to each on them. Once selected, just hit Add at the bottom.
You may also hide the added collection from your ‘Collections Listing’, ‘Product Listing’, ‘Search Results’, or hide all ‘Links to Content’ that may lead to restricted products.
Remember, this may require changes to the theme so please reach out to us on theme@wholesalehelper.io.
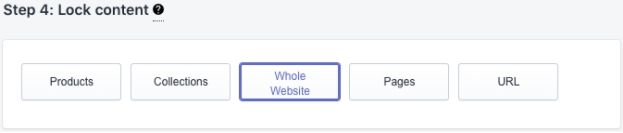
28. What does the 'Whole Website' option do?
When creating a Lock, in the fourth step, the third option of ‘Whole Website’ that restricts the entire Website.
Remember, people can still sign-up for your store as that is a Shopify feature.
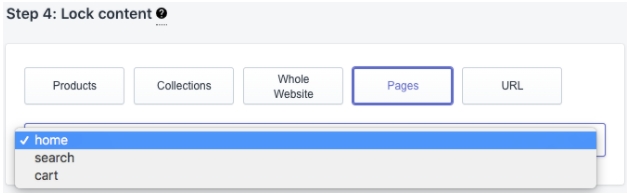
29. What does 'Pages' option do?
When creating a Lock, in the fourth step, there’s a ‘Pages’ option to restrict access to certain pages on your Website. For example, here I’m restricting access to home page
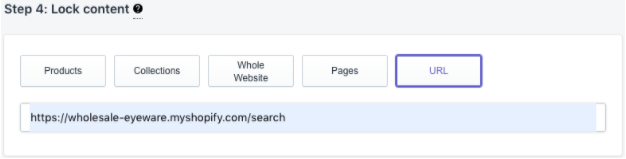
30. What does the 'URL' option do?
When creating a Lock, in the fourth step, the last option of ‘URL’ lets you restrict access to a specific address of the site.
Remember, this is different from other options in the same step, as it lets you put a Lock on specific addresses rather than the entire Page or Website etc.
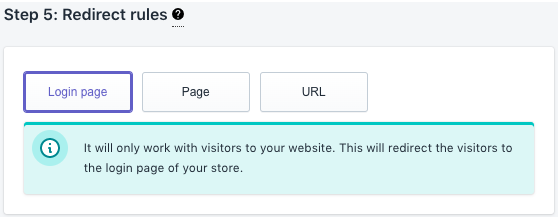
31. What does the Login Page option do in Step 5?
When creating a Lock, in the last step there's the ‘Login Page’ option. It redirects visitors or customers back to the login page of your store if they attempt to access content or products that they are not eligible for.
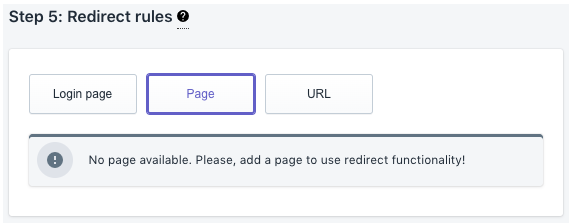
32. What does Redirect to Page option do in Step 5?
When creating a Lock, in the last step, the ‘Page’ option redirects a visitor or customer to a page you’ve selected from your Website if they attempt to access content or products that they are not eligible for.
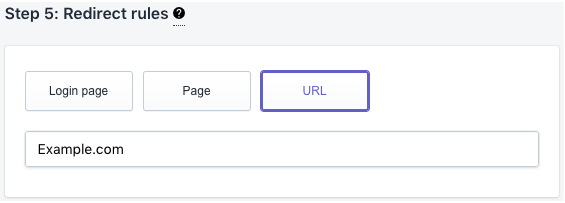
33. What does it mean to Redirect URL in Step 5?
When creating a Lock, in the last step, the ‘URL’ option redirects a visitor or customer to a specific URL address if they attempt to access content or products that they are not eligible for. It can be a Shopify native or an external address.
34. Can I Edit or Delete previously created Locks?
Yes, you can by clicking on Apps in the admin panel, then by selecting our Lock Manager app from the list. Once on the homepage of the Lock Manager application, under the Action column just hit Edit to reconfigure a specific Lock or Delete to permanently remove it.
35. Can I retrieve deleted Locks?
No, you cannot retrieve a Lock once it has been deleted from the Lock Manager app. We also cannot retrieve a Lock for you in such a case.
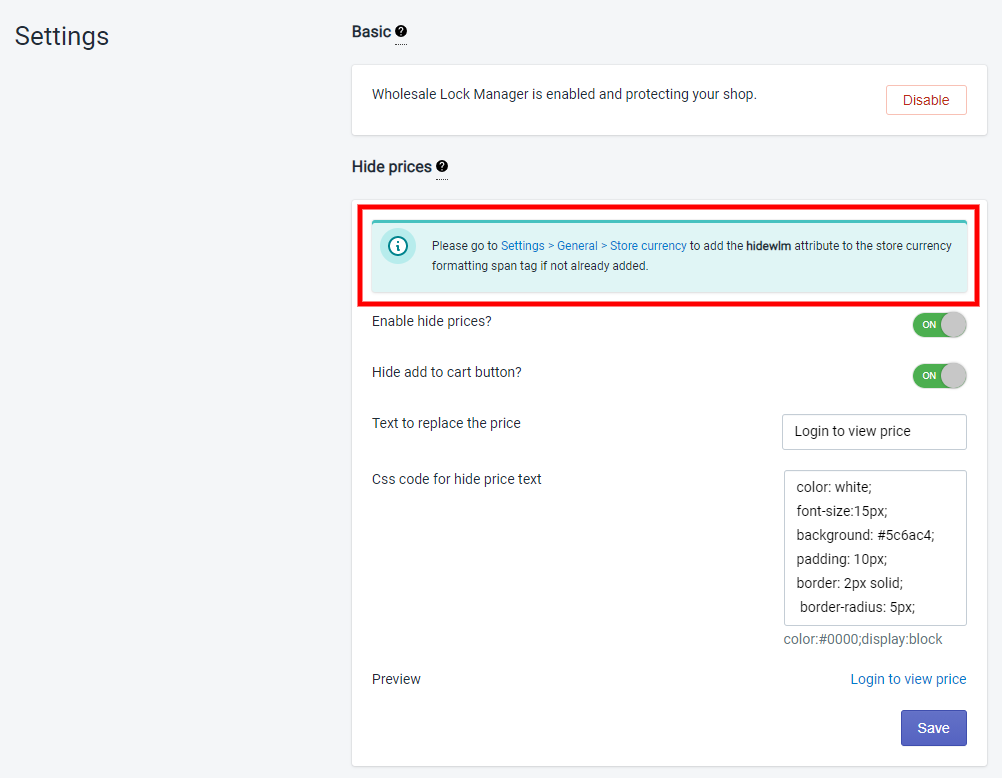
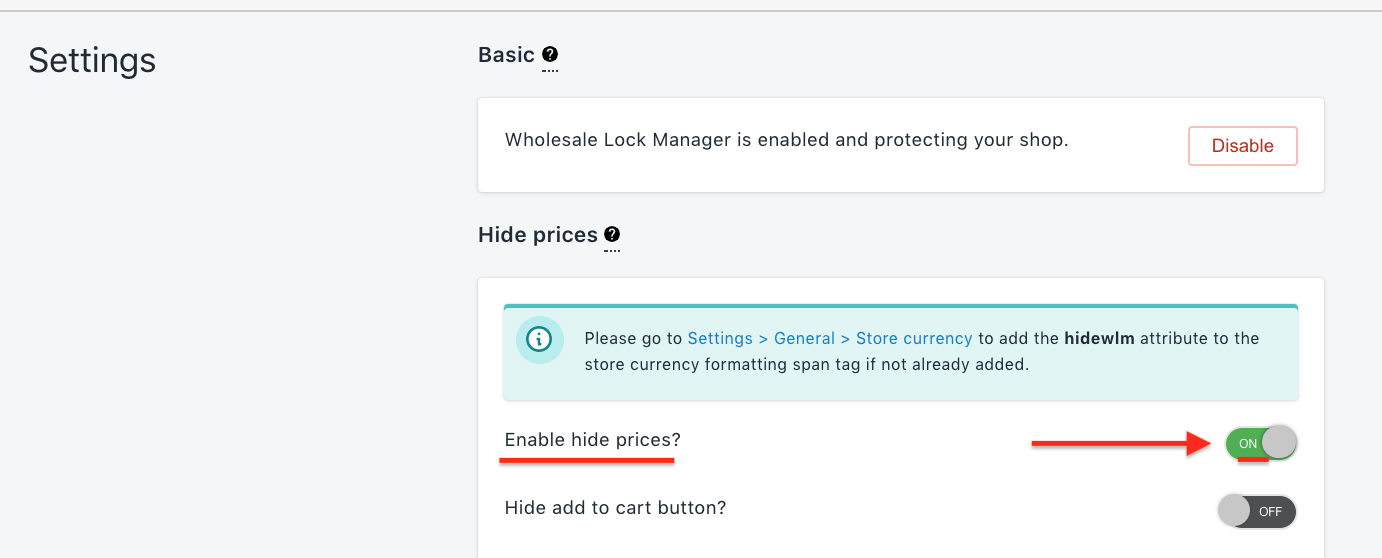
36. How do I hide prices for visitors (or non-logged in customers)?
A) Click on “Hide Price” in the top menu.
B) Add the “hidewlm” attribute as instructed in the banner.
C) Turn on the ”Enable hide prices?” option.
D) That’s it
37. How do I show prices to specific customers based on specific tags?
Currently, the app only has the option to hide the prices for all non-logged in customers.
38. How to change the 'Login to view price link' text?
Use the “Text to replace the price” field value.
39. Is WLM compatible with any search Filter app?
Yes, WLM is compatible with “Product Filter & Search By Boost Commerce” and “Smart Search & Instant Search by Searchanise” apps.
40. How do I integrate WLM with the “Product Filter & Search By Boost Commerce” or the “Smart Search & Instant Search by Searchanise” app?
Please email us at themes@wholesalehelper.io with subject line WLM integration with search app. Please include your store URL too!
41. WLM is not working on the ajax search popup, how can I resolve it?
It requires manual integration to make WLM compatible with the ajax search popup. The integration will only work on inbuilt search popup. Please email us at themes@wholesalehelper.io for help.
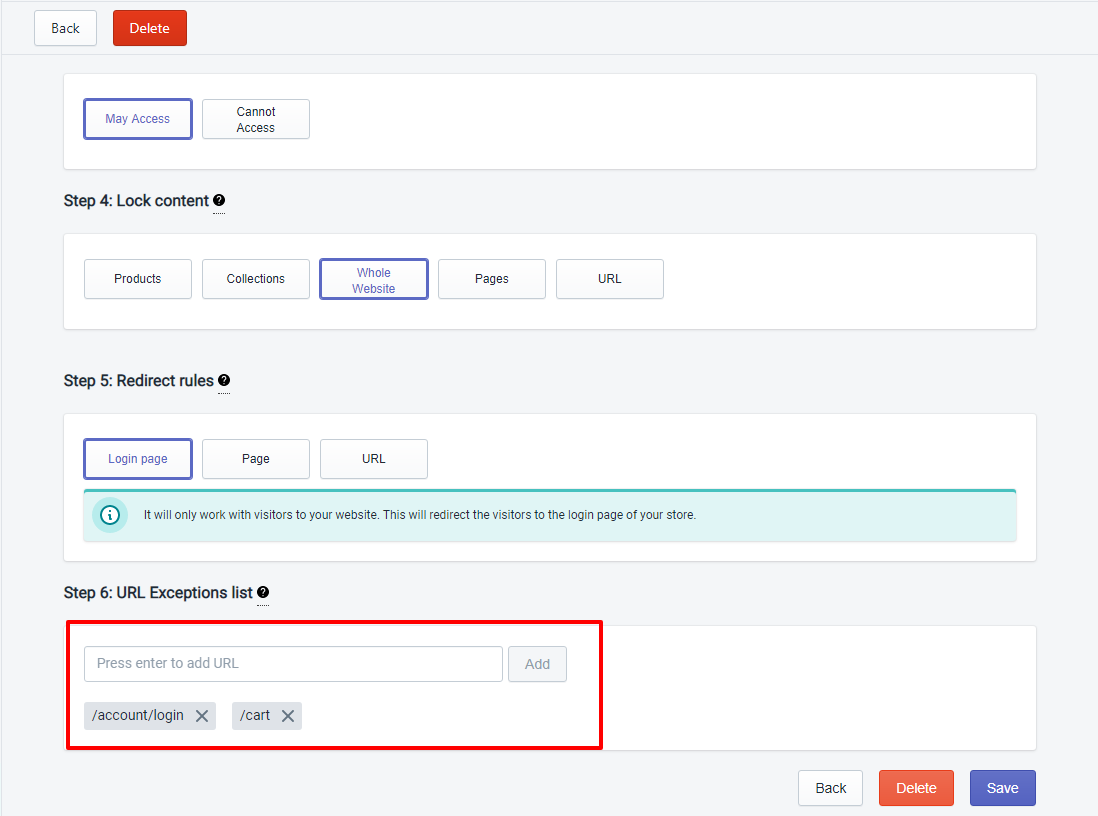
42. How do I lock the whole website except specific pages?
When you create a lock on the whole website, you will see step #6 to add exception URLs. Please enter or type a URL and click the “Add” button to make the page available for visitors even if the website is locked. You can add pages under the URL exception list.
43. WLM is integrated with the search app but the products are still visible on the search page. What should be missing?
Please try the following solutions:
Make sure the app and lock are enabled.
Check “Hide locked listings from products”, “Hide locked listings from search” and “Hide all links to locked content” options
If the lock is on collections check “Hide locked listings from collections”, “Hide locked listings from products”, “Hide locked listings from search”, “Hide all links to locked content”
If still having issues after, please email us themes@wholesalehelper.io
44. What should I do if I need help?
Please feel free to reach out to us via email on themes@wholesalehelper.io. We are available from 8 AM to 5 PM Pacific Standard Time.
Last updated